Got 2 x 80ltr containers today to start my aquaponics system.
I have never done anything with this before so I ordered the DVD from Murray Hallam's Aquaponics made easy
I placed them where i will start this project in my conservatory filled with water and added some plants i got from the pet store.
I will post as i proceed with this and after I watch the DVD but I hope to have some Jade perch going in my tanks.
Wednesday, July 14, 2010
Thursday, July 8, 2010
Ethanol Heater
Ethanol Fire Heater. Living in an apartment restricts to a degree what types of heaters you can have, obviously there is the usual electric heaters but these are costly and reliant on the power being on. Most apartments come with reverse cycle heating, in our place the heater warms the bedrooms but is very inefficient in the lounge.
Cost ? although the unit is relatively inexpensive, the fuel is about $4.50 per Ltr, we have found on average 1Ltr burns for about 5 1/2 hours.
Where to purchase from ? I got mine from eBay and found it in the city was able to collect it, but many fireplace stores or Eco stores are now carrying these fires.
Click here to search eBay for Ethanol fire !
Most of these types are mounted on a wall, it was pretty easy just 4 holes drilled and bolts were supplied.
the black surround is heat profed and treated for a safe surround and has side panels that reduce draft affecting the flame
The stainless stele box on this model (350) contains 1 Ltr of fuel
To pour fuel you slide the key hole cover place in funnel and pour the liter into box. careful not to spill any as this can and will catch alight.
close keyhole cover and slide the whole lid backwards to reveal firebox
using a lighter stick / gas oven lighter just ignite fuel. ( I have noticed when box is half full it is a lot harder to light and takes 4/5 attempts, as it keeps going out.)
Ethanol Fuel is also known as Methylated spirits
The fire takes about 5 minutes to get really burning well and then gives out some good heat.
I did some test and the temp at other side of room was 5c colder than area near fire, you can definably feel the heat.To extinguish the fire use the 2 rods and lift cover up from back
Slide the cover over box and this puts out the fire. (don not attempt to refuel once it has been lit! it takes about 20 mins for it to be back at room temperature and can then be refueled)
slide
Wednesday, July 7, 2010
Water Storage
Water Storage is probably the most important item in your survival preps!
without food we could survive up to 3 weeks, without water we can only survive 3 days!Why would we need to store water ?
well a natural disaster could break water pipes, or a contamination at water source, or even a pandemic where we were told to stay indoors and self quarantine.In any of these events the stores would be crazy and empty supplies in hours, plus the last place you want to be is putting yourself in danger around desperate people.
thats why you need to keep an emergency supply of water.The recommended amount is 8 glasses of water each per day, also we do get a considerable amount of fluids from food and other drinks, this all counts.
So on average it is recommended that you will need 1/2 Gallon or 2 ltrs each per person per day!
Minimum 3 Days for 4 People - 6 Gals or 24 ltrs (10 fruit juice bottles)
Recommended 7 Days for 4 people - 14 Gals or 56 ltrs (24 fruit juice bottles)
Very Good 30 Days for 4 people - 60 Gals or 240 ltrs (100 fruit juice bottles)
How long can we store it for ?
I always say if in doubt boil it! but i change my water about once a year, I use it in my water barrel for the plants and just refill, I do not use any stabilization, although a droplet of clear unscented bleach in a 2ltr container is safe for consumption and will stop algae or bacteria growing, if you wanted to store it for longer.
Ideas for water storage in an apartment. keep water in a cool dark environment like bathroom, a cupboard, under the bed.
2.4Ltr fruit juice bottle makes ideal storage, very strong and easy to stack good seal on lid.
Milk container, is a good starting point but not very strong tends to leak and breaks easy.
These are much stronger and good seal on lid but not much storage capacity difficult to stack,
Wine bags from either box wine or in this case as you see it! very strong, dispenser valve for when pouring, very stackable, and great as spares, washed and stored flat dont take up much room and can be filled quickly. also in case where you had to leave your home in an evacuation these could be taken along with you and filled at destination or along route. keep 4/5 in a BOB ( Bug Out Bag)
Tuesday, July 6, 2010
Hydroponic Bottle Garden
Hydroponic Hanging Garden. Great method for growing veggies and herbs in a confined space, easy to look after, create a mini green house environment in any window.
Supplies needed. !
in this case i used 8 oz -600ml water bottles (preferably all the same)
Roof & gutter Silicon, 6 small squares of sponge,
Vermiculite plant growing mix, Blind cord /sash rope,
lighter and knife, tape measure,
2 1/8 (64mm) Drill bit hole cutter, 1" drill bit,
lighter and knife, tape measure,
2 1/8 (64mm) Drill bit hole cutter, 1" drill bit,
1.5mm small drill bit, small pliers, Philips screw driver,
small 1.5mm stainless stele nut and bolt,
battery or electric drill.
To make your Hanging Hydroponic Garden collect your plastic water bottles preferably all the same size. Depending on how big your window is will decide what number of bottles to use, you will need 1 at top and 1 ant bottom for watering and what ever you can fit in between. mine has 7, 5 growing compartments
First fill up water bottle with water! and stick it in the freezer.
TIP: leave room for water to expand when frozen and turn label to face up this is where air bubble will settle and is not a drilling side? WHY? because drilling the holes is a lot easy with a frozen bottle, try it unfrozen and see what happens!!
Drill a hole with a 2" 1/4 bit on the lower side, also drill a 1" whole on base ( check size of bottle neck you have it may be bigger or smaller)
slide a card sleeve around lower part of bottle with hole and spray top half with matte black paint. ( this helps the roots to grow in the dark)
Finished painted bottle ( I will repeat this 5 times for my specific project you may do more or less depending on window size )
Take one bottle to create top feeder, drill frozen bottle with 2 1/4" bit at the bottom of bottle, also drill 4 small holes in bottom side to tie rope threw, i used blind sash rope and a metal ring, cut 2 pieces of equal length rope feed threw tie add ring and tie to opposite side, cut excess string and seal with lighter to secure knot, add a square of sponge in neck of bottle
get 2 lids and join together with silicon
once 2 lids are dry drill 1 hole in center and 6 round edges then use a small stainless steel nut and bolt to add extra strength
get as many lids as you have growing bottles and drill 2 small holes in center of caps, I used about 1.5mm drill
This bottle is your water collection chamber drill a small hole near top, this will allow air to escape as water drips in bottle (TIP: mark hole with marker pen so when you re-pour you don't spill the water )
Using a clear silicon ( I used drain and gutter silicon) place a bead around neck of bottle and twist it into the bottom of another bottle place a square of sponge in neck of bottle and place on the lid with 2 small holes. ( the sponge will slow the transfer of water from one bottle to another and act as a filter)
Once they are connected fill vermiculite or similar to top of black area using a scoop, ( my scoop is made from a plastic bottle)
this is how it should look ( mini version) top hanging bottle followed by grow bottles and last bottle has the double joined cap and the collection bottle, which allows you to reuse the feed water.
Use a good hydroponic food mix with water, (TIP: run fresh water threw a couple of times before seeding to cleanse and wet the vermiculite)
pour liquid food into top bottle about 1/3 full, this will slowly drip feed all through the other plant areas to bottom collection
water fills the bottom collection bottle, i normally reuse this about 2 times before using fresh mix
This is my first 4 hanging gardens with 5 growing bottles in each, first one has just been seeded with strawberries, 2nd run is top 2 chives and bottom 3 coriander / Cilantro, 3rd one is spinach and last one organic mixed lettuce
spinach about 3 weeks and lettuce about 5 weeks
coriander / spinach / lettuce
I have enjoyed this method of indoor growing and you can use it any where even move it with the sun, it is a perfect micro green house and as you can see maximize space for growing a healthy dinner, I will carry on filling up my conservatory with them and latter will join a 1 time water feed to do all of them at same time watch out for this post.
Green Wall from plastic recycled bottles
My Project was to create a Green wall / living wall using recycled plastic water bottles, I wanted to use as many waste product parts as possible.
.jpg)
I started with drilling a 1" hole in bottom of bottles and 2 x 2 1/4 " holes in sides, then joined them together end to end.
I realized that the only way water would travel all way threw would flood the bottle to half way making it to wet to grow so used a plastic drip pie cut in lengths and L corner joints to complete the loop, I then made lots of drip holes in each growing area for water to leak threw.
I built a wooden frame to fit snug to the size of bottles and brackets on back to support them ( This was a mistake, next time ill use something like peg board to give more support)
I used zip ties to attach each neck of bottle to back support straps
I sprayed everything Matt black to make it look nice.
sprayed back too
then i filled with a light peat mix and vermiculite growing compound ( the weight made all the bottles sag a great deal)
finely added as many green house plants ferns etc as i could get, I really didn't get enough to make it fully covered but it still looked cool!
.jpg)
I them drilled small hole in top and added a tube to top pipe for watering, the last bottle was left uncut as a collection chamber, i originally intended to attach a solar water pump to the collection chamber to re-pump to top again but never completed it!
This is the Green wall several months latter!
The main problem was watering! the water would pass threw the pipe too quickly and not allow enough to soak threw drip holes, My next one I will cure this by adding a piece of sponge in the tube at every joint to slow the water transfer process down, You can also see the support wasn't adequate and the weight crushed it all down. The angle of the bottles holes should have been more upright too!
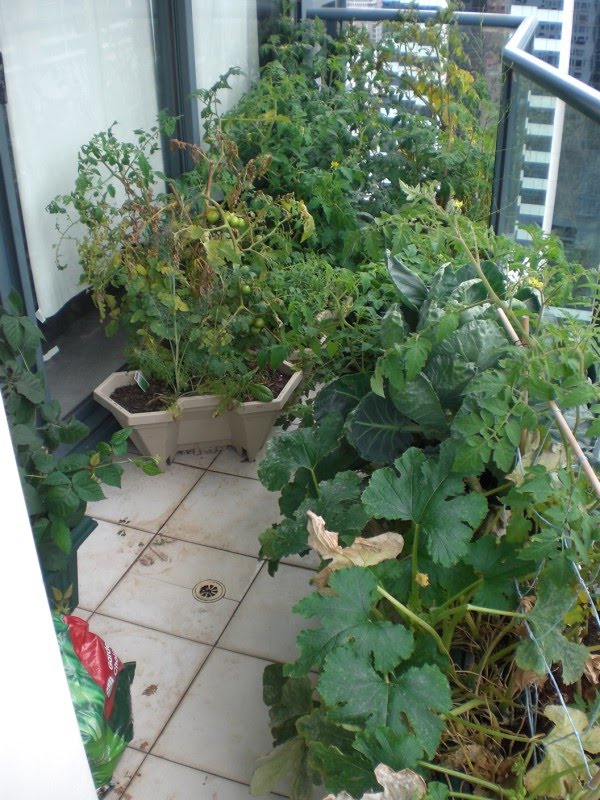
This Years Balcony Garden attempt!
Good crop of tomatoes, no aphids since i planted lots of onions and marigolds, Blackberry bush has grown huge and still growing had to use an old clothes drying rack as a growing frame, Installed a new drip irrigation all the way around balcony from my 100liter water tank with the help from my grandson.
Biggest obstacle has been getting supplies to my apartment, carrying bags of growing mix and compost by bus is a pain to say the least, oh well at least its exercise. I am lucky with that i get 6 hours plus of sun on the balcony, but the winds can be a destroyer drying things out and breaking my tomatoes.
Subscribe to:
Posts (Atom)
.jpg)
.jpg)
.jpg)
.jpg)
.jpg)
.jpg)
.jpg)
.jpg)
.jpg)
.jpg)
.jpg)

.jpg)
.jpg)
.jpg)
.jpg)
.jpg)
.jpg)
.jpg)
.jpg)
.jpg)
.jpg)
.jpg)
.jpg)
.jpg)
.jpg)
.jpg)
.jpg)
.jpg)
.jpg)
.jpg)
.jpg)

.jpg)
.jpg)
.jpg)
.jpg)
.jpg)
.jpg)
.jpg)
.jpg)
.jpg)


.jpg)
.jpg)
.jpg)